This past Thursday night I was trying to find something to watch on TV to pass time. Sitting there like a potato, I thought to myself why not find an easy, quick pattern on Pinterest and make something with yarn leftover from various projects.
I came across this pattern for a stuffed elephant that I thought was truly adorable. The pattern was translated from Japanese to English by a blogger (All About Ami Crochet), and I found her instructions to be easy to follow and helpfully illustrative of the more challenging steps.


The technique used in this pattern is really neat. My experience with amigurumi (The Japanese art of knitting or crocheting stuffed yarn toys, read more in my post about my amigurumi Snorlax) has been crocheting all of the parts individually, and then sewing them together at the end. This pattern, however, brilliantly allows for you to crochet almost all of the elephant (body, legs, and trunk) as a single piece. The ears and tail are crocheted separately and then sewn on.
The pattern works in rounds, and starts with crocheting an oval shape that will end up as the top of the body (the elephant’s back). Most of the pattern simply calls for single crochet, increases, and decreases, with just a few half double crochets as well.
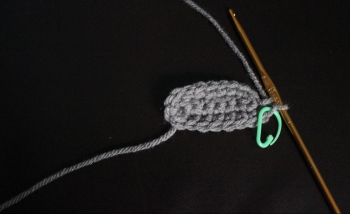
I used a size G hook with the yarn I had on hand. This is the start of the oval, using a stitch marker to mark the end of each round.
I worked on the elephant for several hours Thursday night, and then brought it with me to the office on Friday to continue working during my lunch-time knitting and crocheting group.
The pattern works by creating holes in the body where you will later come back and crochet the trunk and legs. The holes are made with chains, skipping several stitches before the next single crochet.
The first hole in the pattern is for the trunk. After the hole is made, you crochet a “tab” on the chain, which will be the underside of the elephant’s trunk.


From there, you begin a series of chains that will create the base upon which the legs will be crocheted.
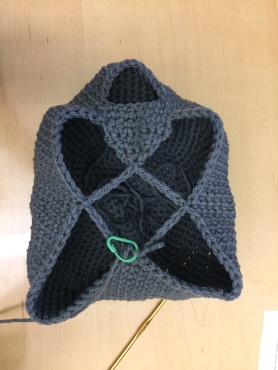
The finished base, ready to start crocheting the legs.
I captured some of my crocheting on video to give you an idea of the process.
In this first video, I am working on the first round for one of the front legs and am single crocheting through the back loops of the chain.
https://gfycat.com/RealisticPastCorydorascatfish
Below is a close up look at the single crochet.
https://gfycat.com/FlashyVigorousAnkole
Each leg is worked in rounds with decreases as you work towards the end of the leg. The final round is all decreases, fastened off, and the yarn end woven in. The video below shows the finishing process for one leg.
https://gfycat.com/gifs/detail/DesertedDeadlyGoitered
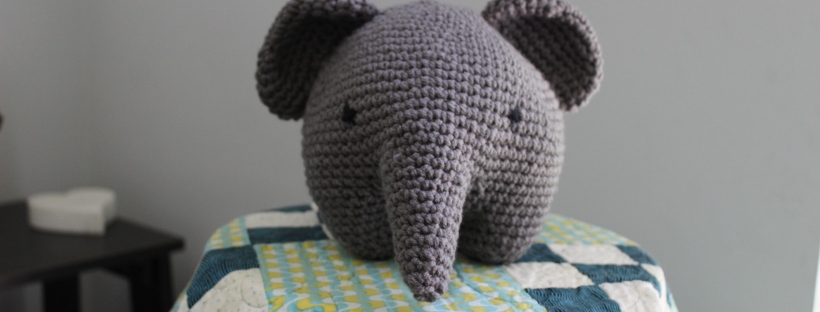
After completing the legs and trunk, I used a black yarn to sew two “x” shaped eyes. Then the elephant was ready to be stuffed. I used Poly-fil fiber to stuff the body and then followed the pattern to create a round patch to sew up the remaining hole on the underside of the body.


The last steps were to crochet two ears and a tail, and then sew these onto the body with a blunt needle. All About Ami Crochet includes a really cute option to sew patterned fabric onto the insides of the ears and to add tusks made of felt. I did not have any fabric or felt on hand so I skipped this part. Even without these embellishments, the finished elephant came out adorable.

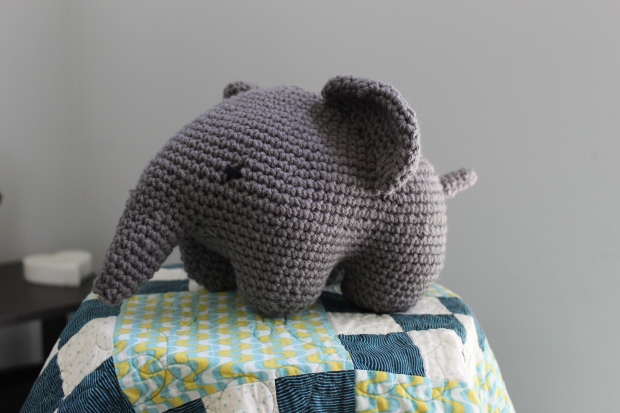
This pattern took me only two days to finish, and came out so cute. I certainly recommend the pattern for anyone looking for a quick project!
Thanks for reading!


He is just adorable!!!!!
LikeLiked by 1 person
Thanks! 😊 I really like this pattern!
LikeLike
Yes, yes I must make this little guy for my Phoebe! Thanks for sharing you are just fearless to try new patterns.
LikeLiked by 1 person
You should make one in pink for Phoebe! The blog I found the pattern on also made a pink one and it was so, so cute!
LikeLike
very cute, and what a clever tuto, with the idea of chains on underside, to create openings for legs!
LikeLike
It’s brilliant 🙂 I have a hard time making sure everything is even and symmetrical when sewing all the parts on. This method makes it so much easier!
LikeLike
So cute! It is neat to see the final product after seeing him(?) part way through the creation process!
LikeLiked by 1 person